Ergonomic RetroPie Arcade Controller

As someone who grew up in the 70s and 80s at the dawn of the video arcade craze, I've always wanted to relive those old gaming experiences. Now with the advent of RetroPie, Mame, and the Raspberry Pi, that's actually super cheap and easy to do!
So naturally I went looking for a nice arcade controller for my Raspberry Pi and I soon discovered upperpininsulaplastics' excellent "Ultimate Retropie Joystick Controller" (https://www.thingiverse.com/thing:2771521). This is a great model and it was almost what I was looking for but when I printed one for myself I found that it was a bit chunkier (taller and more boxy) than I really wanted. So I figured I'd take my own crack at it and this is what I've come up with.
My requirements:
- It needed to come as close as possible to an authentic full-size arcade controller layout.
- It needed to fit on my Ender 3 (which means that any single piece couldn't be larger than the 220x220mm bed size).
- It needed a place for me to comfortably rest my right palm.
- It needed to work with RetroPie but it did NOT need to actually contain a Raspberry Pi. I'd be using my own case for that.
The reason I didn't need it to contain a Raspberry Pi was that I already had a nice Raspberry Pi case (https://www.thingiverse.com/thing:604915) and I wanted to keep the Raspberry Pi close to the TV so I wouldn't have to worry about stringing an HDMI cable and power cable across the room.
What you see here is the design that I came up with. I've also included the original Fusion 360 project that I used to create it so that you can tinker with it if you want to. Note that this is not a remix of upperpeninsulaplastics' design. While I definitely took some inspiration from that, I started completely from scratch on this one.
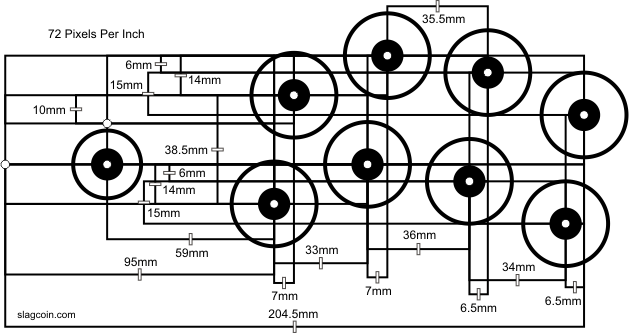
The controller layout is an actual layout used on Sega arcade machines. Specifically this one https://www.slagcoin.com/joystick/layout/sega1_s.png which I found on this page here: https://www.slagcoin.com/joystick/layout.html. I knew I wouldn't have room for all eight finger buttons on the top but I figured there would be room for six and the last two could be mounted on either side, perfect for pinball sims!
In order to make room for my palm to rest on the top, I rotated the layout counter clockwise from the joystick. I figured that with the stick in line with my left hand, I'd naturally hold my right hand in that position anyway and, as it turns out, I was right. It's super comfortable this way.
In keeping with the more ergonomic theme, I tilted the top five degrees forward which allowed me to slim the case down quite a bit.
The case fits pretty much any of the standard arcade button USB kits available on the internet. I chose the Amazon's Choice Hikig 2 Player kit found here: https://www.amazon.com/gp/product/B07JFXQSM5 but pretty much any similar kit would do.
One tip I have is to number all of the button connectors using tabs made with masking tape. That makes it easy to make sure that you assemble it the same way each time. If you're making more than one controller and if your kit is anything like mine, you'll want to be sure you wire both controllers in exactly the same way since RetroPie will recognize them both as the same type of controller and use the same button mapping for both of them.
To assemble it, you'll want 4 short (~4mm long) 3mm screws to hold down the PCB and 4 larger screws and nuts for the joystick. I used #10-32 3/4in flat head phillips machine screws since I live in the states and they were easily available but I'm sure you could find equivalent metric screws pretty easily.