Venator Star Destroyer - LED Mod
--- This is a work in progress ---
I will provide more information and updates throughout the next couple of weeks

Updates
- 2019/09/29 - Initial Upload, Basic Files and Pictures
- 2019/10/03 - Added Post Print Work Description
- 2019/10/03 - Added Material Description
- 2019/10/12 - Added STL Files for Stand + Description
- 2019/10/19 - Added Print Settings Description
About
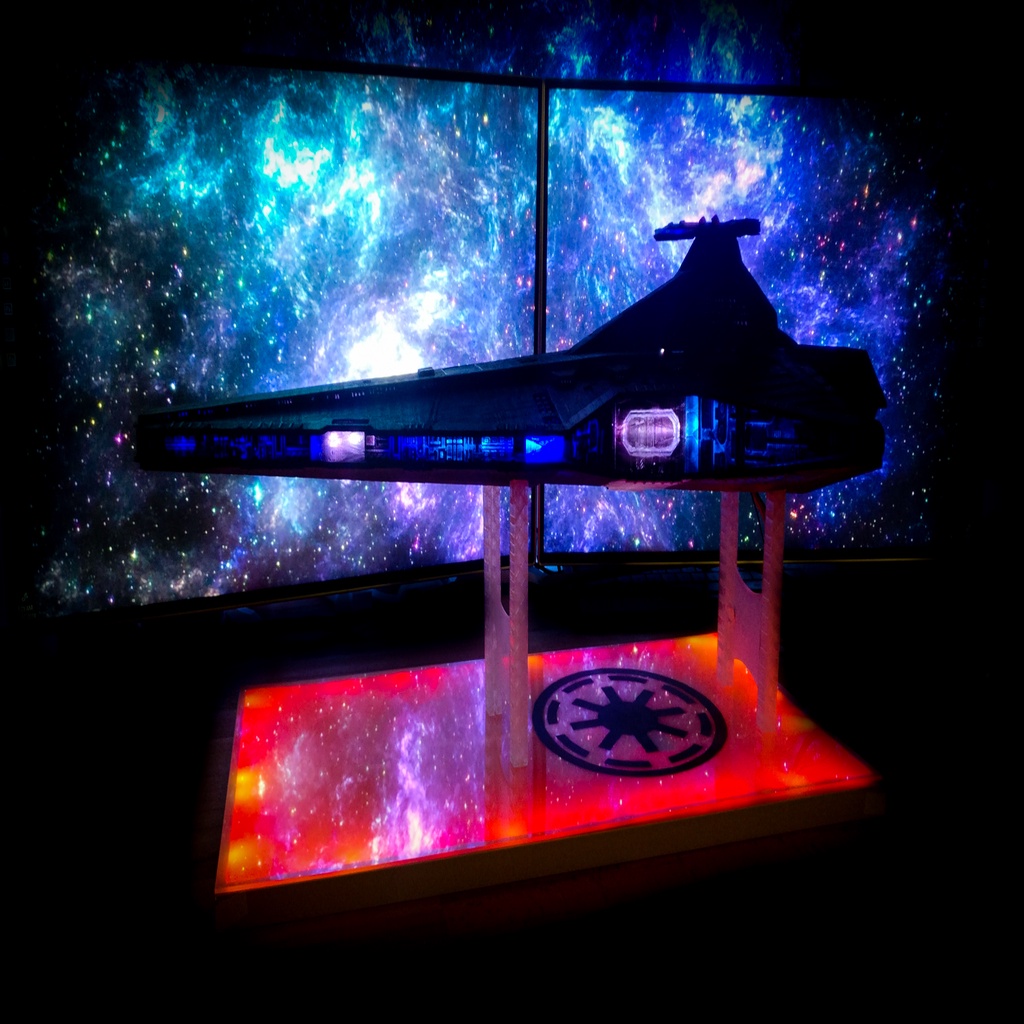
I remixed this Star Destroyer to be hollow so that LEDs could be put inside.
I started this project in July 2019 and by now I am very pleased with the results so I decided to share.
I hollowed out most parts, cut them into smaller pieces. Separated tiny things like turrets and towers for better printability.
I used transparent PLA to print all the parts and then airbrushed them.
Overall (modifiying the design, prototyping parts, post print, airbrush, electronics) I put in far beyond 300 work hours and probably more than 100 print hours.
The assembled print is about 63cm long, 30cm wide and 17cm high (26 incl. stand).
Print Settings
Settings for large parts
- Nozzle: 8mm
- Layer Height: 0.2mm
- Bed Temperature: 68°C
- Nozzle Temperature: 208°C
- Infill: 20 - 25%
- Other: Printed on glass, Skirt
Settings for small parts, like cannons, details for the side etc.
- Nozzle: 2mm
- Layer Height: 0.1mm
- Bed Temperature: 68°C
- Nozzle Temperature: 208°C
- Infill: 20 - 25%
- Other: Printed on glass, Brim
Stand
I just recently build the stand and added the files. The parts are to be mirrored as well.
Additionally I airbrushed an acrylic glass plate with the logo of the Galactic Republic and put it on Aluminum LED Profiles so it gets illuminated from below.

Materials used
- Transparent PLA
- Arduino Nano
- Wires
- WS2812b LED Strips
- WS2812b Single LEDs
- LED Aluminum Profiles
- Acrylic Glass Plate (50x25cm)
Post Print Work
The way the model currently is designed, there is a lot of work effort you'll have to put in after printing. The way I build this was iterativ and I did not take my time to redesign and reprint all the part that I modified by hand.
The tools I used were basically:
- Files
- Drill
- Dremel
- Soldering iron (with the temparature set to 220°)
- Hot glue gun
- Airbrush
Those were mostly used to drill or "burn" holes for the wires.
Files
I numbered the files to help you to print the Star Destroyer orderly. All the Parts need to be mirrored.